Visit Rentovault to find adventure and photography
gear rentals from your neighbours.
As a photographer, capturing the perfect shot with the right exposure can be challenging, especially in tricky lighting situations. That’s where exposure bracketing comes in. In this article, we’ll explore exposure bracketing, focusing on Canon and Sony cameras, and discuss how you can use this technique to take stunning HDR photographs.
What is Exposure Bracketing?
Dynamic range and HDR images
Dynamic range, in the context of photography, refers to the range of light levels that a camera can capture in a single image, from the darkest shadows to the brightest highlights. It essentially represents the difference between the darkest and lightest tones that can be recorded without losing detail. In real-world scenes, especially those with complex lighting, the dynamic range can be quite broad, making it challenging for a camera to capture all the nuances of light and shadow in a single exposure.
HDR, which stands for High Dynamic Range, refers to images that have a greater range of luminosity or brightness levels than standard photographs. In simple terms, HDR images display more details in both the darkest and brightest areas of a scene, allowing for a more accurate representation of the real-world lighting conditions.
Exposure Bracketing to the rescue
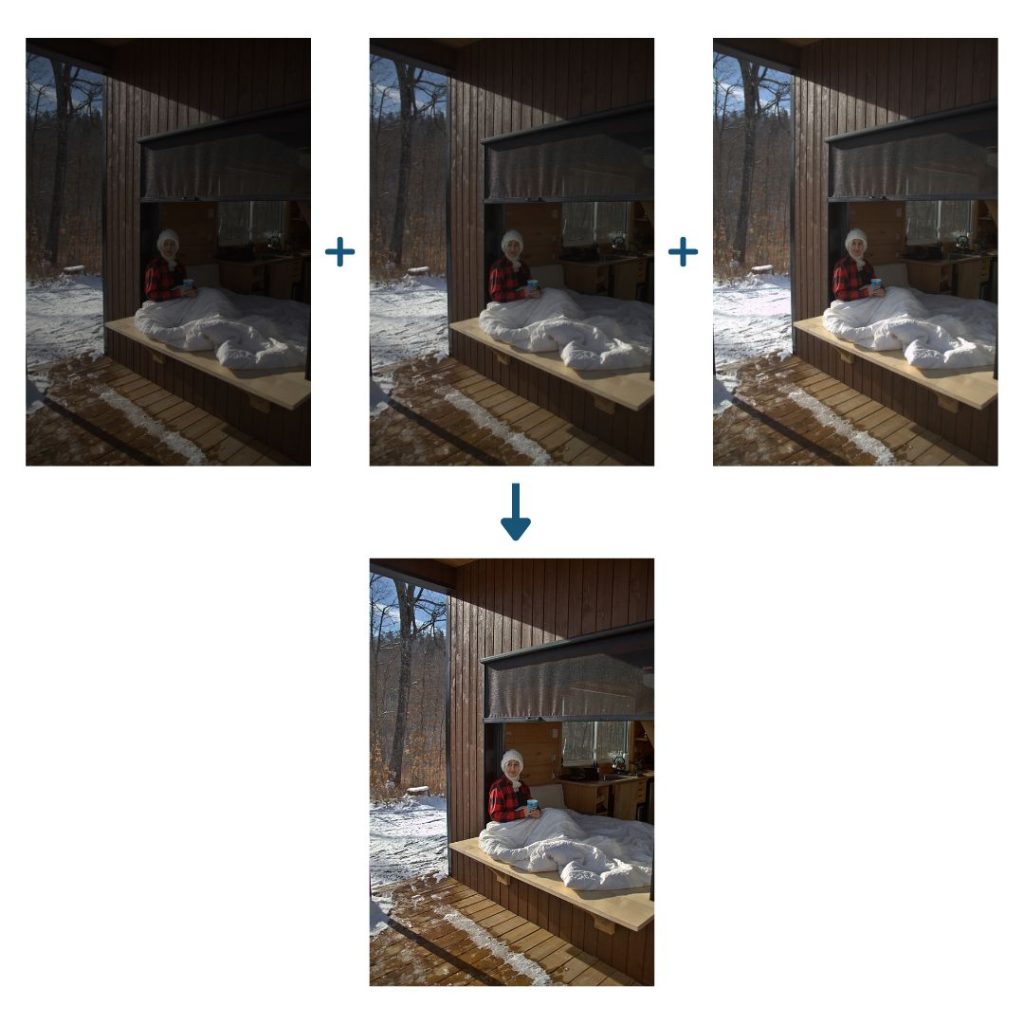
Exposure bracketing plays a crucial role in obtaining HDR images and capturing the full dynamic range of a scene. In high contrast situations, where there are both extremely bright and dark areas, a single exposure may not accurately represent the entire range of light levels present. By using exposure bracketing, photographers can capture a series of images with varying exposure levels that cover the highlights, mid-tones, and shadows of the scene. Merging these bracketed images in post-processing creates an HDR image that showcases the full spectrum of light, resulting in a more visually appealing and accurate representation of the scene. This technique is particularly useful in landscape photography, cityscapes, and other situations where the dynamic range exceeds the capabilities of the camera sensor.
Manual Exposure Bracketing
Manual exposure bracketing is an alternative to AEB, where the photographer adjusts the camera settings manually for each shot in the series. This method provides greater control over the exposure settings but requires more time and effort. We will cover this first as it is the same for different camera brands. The auto exposure bracketing options offered by different cameras are covered later.
How to Set Up Manual Exposure Bracketing
- Turn on your camera and set it to Manual (M) mode.
- Take a test shot and check the exposure. Note the aperture, shutter speed, and ISO settings used for this shot.
- For the next shot, adjust the aperture, shutter speed, or ISO to increase or decrease the exposure by your desired bracketing increment (e.g., 1 stop). Take the photo.
- Repeat step 3 for additional bracketed shots, adjusting the exposure settings as needed.
- Taking Multiple Photos with Different Settings. Remember to keep the camera steady between shots to ensure consistent framing. A tripod is highly recommended for this purpose. Also, consider using a remote shutter release or the camera’s self-timer function to minimize camera shake
Auto Exposure Bracketing
Most DSLRs and Mirrorless cameras have built-in features to simplify the Exposure Bracketing process. These settings allow the camera to automatically take a series of photos with varying exposure levels at a single press of the shutter button.
How to Set Up Auto Exposure Bracketing in Canon Rebel T7
- Turn on your camera and ensure it’s set to either Aperture Priority (Av) or Shutter Priority (Tv) mode. You can change the mode using the mode dial on the top of the camera.
- Press the ‘Q’ (Quick Control) button located on the back of the camera, right next to the screen. This will bring up the Quick Control screen.
- Navigate to the ‘Exposure Compensation/AEB’ setting by using the directional buttons on the back of the camera. The icon looks like a small square divided into light and dark halves, with a +/- symbol above it.
- Press the ‘Set’ button in the middle of the directional buttons to enter the AEB setting.
- Adjust the exposure bracketing range using the left and right directional buttons. The range will be displayed on the screen as three exposure levels (e.g., -2, 0, and +2). You can adjust the increments to your desired values. Smaller increments, such as 1/3 or 1/2 stops, are typically used for subtle exposure adjustments, while larger increments like 1 or 2 stops may be necessary for high contrast scenes.
- Press the ‘Set’ button again to confirm your selection and lock in the AEB settings.
- Exit the Quick Control screen by pressing the ‘Q’ button once more or half-pressing the shutter button.
Now, when you press the shutter button, your Canon Rebel T7 will automatically take a series of photos with the selected exposure bracketing range. Keep in mind that the camera will take the bracketed shots one at a time, so you’ll need to keep pressing the shutter button until the three shots are taken.
How to Set Up Auto Exposure Bracketing in Sony a6000
- Turn on your camera and ensure it’s set to an appropriate mode, such as Aperture Priority (A), Shutter Priority (S), or Manual (M) mode. You can change the mode using the mode dial on the top of the camera.
- Press the ‘Fn’ (Function) button located on the back of the camera, to the right of the screen. This will bring up the Function menu.
- Navigate to the ‘Drive Mode’ setting using the control wheel or directional buttons on the back of the camera. The Drive Mode icon looks like a stack of rectangles with a small triangle pointing to the right.
- Press the center button in the middle of the control wheel to enter the Drive Mode settings.
- Select the ‘Bracket’ option from the Drive Mode settings. This will bring up the bracketing options.
- Choose the desired bracketing type. For AEB, select ‘Cont. Bracket’ (Continuous Bracketing) or ‘Single Bracket’ (Single-shot Bracketing), depending on whether you want the camera to take all bracketed shots in one continuous burst or individually with each press of the shutter button.
- Select the exposure bracketing range and increment. You can choose from a range of options, such as 0.3, 0.7, or 1.0 EV, depending on your desired level of exposure adjustment. The number of bracketed shots can also be set, typically 3 or 5.
- Press the center button to confirm your selection and lock in the AEB settings.
Now, when you press the shutter button, your Sony a6000 will automatically take a series of photos with the selected exposure bracketing range and increment. If you choose Continuous Bracketing, the camera will capture all bracketed shots in a single burst, while Single-shot Bracketing will require pressing the shutter button for each shot.
Post-Processing: Combining Bracketed Shots
HDR Software Options
Once you have your bracketed shots, you can merge them into a single HDR image using specialized software like Adobe Lightroom, Photomatix Pro, or Aurora HDR.
Free softwares such as Darktable, does not do auto- alignment of the bracketed shots, and so it can only produce good results when the photos are perfectly aligned.
The Merge Process
The process of merging bracketed photos varies depending on the software you’re using, but generally involves the following steps:
- Import the bracketed photos into the software.
- Select the photos and choose the ‘Merge to HDR’ or similar option.
- Adjust the HDR settings to your liking, such as tone-mapping, contrast, and saturation.
- Save the final HDR image.
Tips and Tricks for Exposure Bracketing
- Use a tripod to ensure consistent framing and minimize camera shake.
- For AEB, use continuous shooting mode for faster bracketing.
- Experiment with different bracketing ranges and increments to find the best settings for your specific scene.
- Pay attention to the histogram on your camera’s LCD screen to monitor exposure levels.
Conclusion
Exposure bracketing is a powerful technique that can help you capture stunning images with your Canon DSLR, even in challenging lighting situations. By understanding how to use Auto Exposure Bracketing and Manual Exposure Bracketing, you’ll be better equipped to handle any photographic challenge. Don’t forget to merge your bracketed shots in post-processing to create breathtaking HDR images.
FAQs
- Can exposure bracketing be used with other camera brands?
Yes, exposure bracketing is a feature available on many DSLR and mirrorless cameras, not just Canon.
- How many photos should I take for exposure bracketing?
The number of photos depends on your desired bracketing range and increments. Typically, a series of three to five photos is sufficient.
- Do I always need to create HDR images with bracketed shots?
No, you can also choose the best-exposed image from the bracketed series and use it as a standalone photo.
- Can I use exposure bracketing for all types of photography?
Exposure bracketing is best suited for situations with challenging lighting, such as landscape photography, cityscapes, or interiors with mixed lighting. It may not be necessary for evenly lit scenes or fast-moving subjects.
- What other camera settings should I consider when using exposure bracketing?
Make sure your camera’s white balance, focus, and metering modes are set correctly for the scene to ensure optimal results.